Introduction
You can start Copilot облачный агент sessions from several places on GitHub. Once a session is running, you can monitor its progress, steer it with follow-up prompts, and iterate on the resulting pull request—all without leaving the browser.
For more information about Copilot облачный агент, see О облачном агенте GitHub Copilot.
Starting a session from the agents tab or panel
You can start sessions from the agents tab and the agents panel. The only difference is the entry point—once you see the "New agent task" form, the steps are the same.
-
Откройте панель или вкладку агентов:
- Откройте вкладку в репозитории.
- Перейдите на страницу агентов: перейдите к github.com/copilot/agents. Вы также можете получить здесь, открыв панель агентов, а затем щелкнув "Просмотреть все".
- Откройте панель агентов: щелкните в панели навигации в правом верхнем углу GitHub.
-
Используя выпадающее меню в поле запросов, выберите репозиторий, в котором хотите Copilot работать.
-
Введите запрос, описывающий запрос. Вы также можете добавить визуальные вводы, такие как скриншоты или макеты интерфейса, вставляя, перетаскивая или загружая изображение. Поддерживаемые файлы: image/png, image/jpeg, image/gif, image/webp.
Например:
Implement a user friendly message for common errors.Если хотите Copilot открыть pull request, можете, например, спросить в своём prompt
Open a pull request to implement a user friendly message for common errors. -
По желанию выберите базовую ветвь для Copilotизменений . Copilot создам новую ветку на базе этой ветки.
-
По желанию, вы можете кликнуть , чтобы открыть выпадающее меню агента, если хотите назначить агента или Пользовательский агент агента со специализированным поведением и инструментами. Вы можете выбрать существующий Пользовательский агент из вашего репозитория, организации или предприятия. Вы также можете нажать «Создать агент», чтобы создать новый Профиль агента файл в выбранном репозитории и ветке. Дополнительные сведения см. в разделе Создание кастомных агентов для Copilot облачный агент.
Примечание.
Сторонние агенты доступны в планах GitHub Copilot Pro, GitHub Copilot Pro+, GitHub Copilot для бизнеса и GitHub Copilot Enterprise.
-
По желанию вы можете использовать выпадающее меню для выбора модели, которая Copilot будет использоваться. Дополнительные сведения см. в разделе Изменение модели ИИ для облачного агента GitHub Copilot.
-
Нажмите или нажмите Enter.
Copilot начнёт новую сессию, которая появится в списке под окном с подсказками. Copilot Буду работать над задачей и отправлять любые изменения в коде.
Вы можете отслеживать Copilotработу и открывать pull request одним кликом из журналов сессии. Дополнительные сведения см. в разделе [AUTOTITLE](/copilot/how-tos/use-copilot-agents/cloud-agent/track-copilot-sessions).
Starting a session from the dashboard
You can ask Copilot to start work from the prompt box in the dashboard. The dashboard is your personalized overview of your activity on GitHub, seen when you visit https://github.com while logged in.
-
Navigate to the dashboard at https://github.com.
-
Click the Task button.
-
Using the dropdown menu in the prompt field, select the repository you want Copilot to work in.
-
Type a prompt describing your request.
For example,
Implement a user friendly message for common errors.If you want Copilot to open a pull request, you can ask in your prompt, for example
Open a pull request to implement a user friendly message for common errors. -
Optionally, select a base branch for Copilot's pull request. Copilot will create a new branch based on this branch.
-
По желанию, вы можете кликнуть , чтобы открыть выпадающее меню агента, если хотите назначить агента или Пользовательский агент агента со специализированным поведением и инструментами. Вы можете выбрать существующий Пользовательский агент из вашего репозитория, организации или предприятия. Вы также можете нажать «Создать агент», чтобы создать новый Профиль агента файл в выбранном репозитории и ветке. Дополнительные сведения см. в разделе Создание кастомных агентов для Copilot облачный агент.
Примечание.
Сторонние агенты доступны в планах GitHub Copilot Pro, GitHub Copilot Pro+, GitHub Copilot для бизнеса и GitHub Copilot Enterprise.
-
Click Send now or press Return.
You will be taken to the agents tab, and Copilot will start a new session, which will appear in the "Recent sessions" list below the prompt box. Copilot will work on the task and push any code changes.
Примечание.
If you have enabled the New Dashboard Experience in feature preview, the new session will appear in "Agent sessions" under the prompt box in your dashboard. For more information, see Личная панель мониторинга.
Starting from Copilot Chat
-
Open Чат GitHub Copilot on GitHub.com.
-
Type
/taskto ask Copilot to create a pull request, and give details of what you want Copilot to change.For example,
/task Create a pull request to put backticks around file names and variables in output. -
Optionally, select a base branch for Copilot's pull request. Copilot will create a new branch based on this branch, then push the changes to a pull request targeting that branch.
-
По желанию, вы можете кликнуть , чтобы открыть выпадающее меню агента, если хотите назначить агента или Пользовательский агент агента со специализированным поведением и инструментами. Вы можете выбрать существующий Пользовательский агент из вашего репозитория, организации или предприятия. Вы также можете нажать «Создать агент», чтобы создать новый Профиль агента файл в выбранном репозитории и ветке. Дополнительные сведения см. в разделе Создание кастомных агентов для Copilot облачный агент.
Примечание.
Сторонние агенты доступны в планах GitHub Copilot Pro, GitHub Copilot Pro+, GitHub Copilot для бизнеса и GitHub Copilot Enterprise.
-
Click or press Enter.
Copilot will start a new session, which will appear in the list below the prompt box. Copilot will work on the task and push changes to its pull request, then add you as a reviewer when it has finished, triggering a notification.
Assigning an issue to Copilot
You can ask Copilot to start working on an issue by assigning the issue to Copilot. Copilot will start working on the task, raise a pull request, then request a review from you when it's finished.
Примечание.
This feature is in Публичный предварительный просмотр and subject to change.
-
На GitHubперейдите на главную страницу репозитория.
-
В поле имени репозитория щелкните Issues.

-
Open the issue that you want to assign to Copilot.
-
In the right side menu, click Assignees.
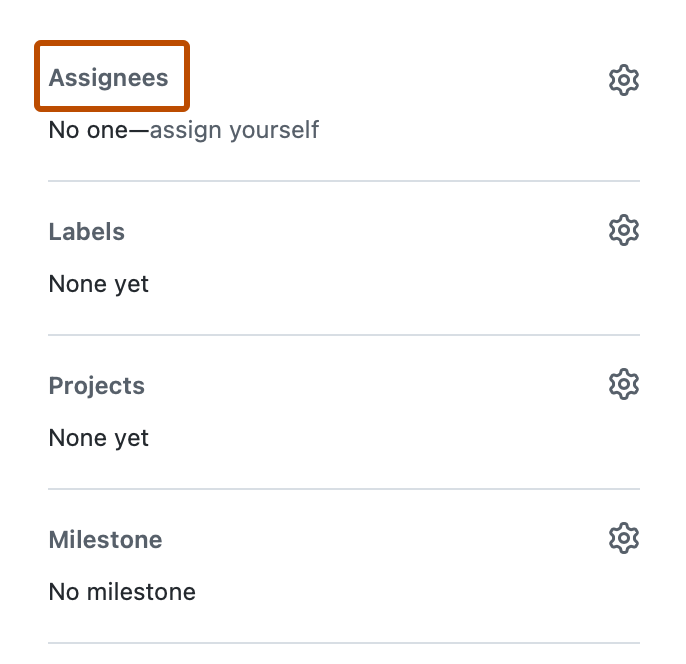
-
Click Copilot from assignees list.
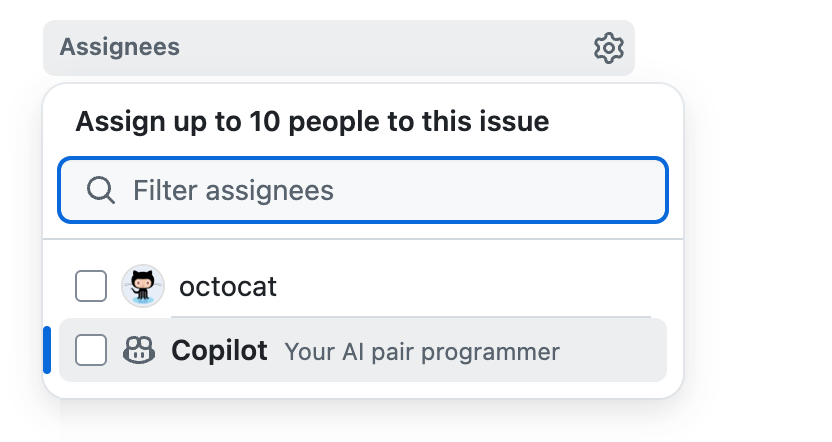
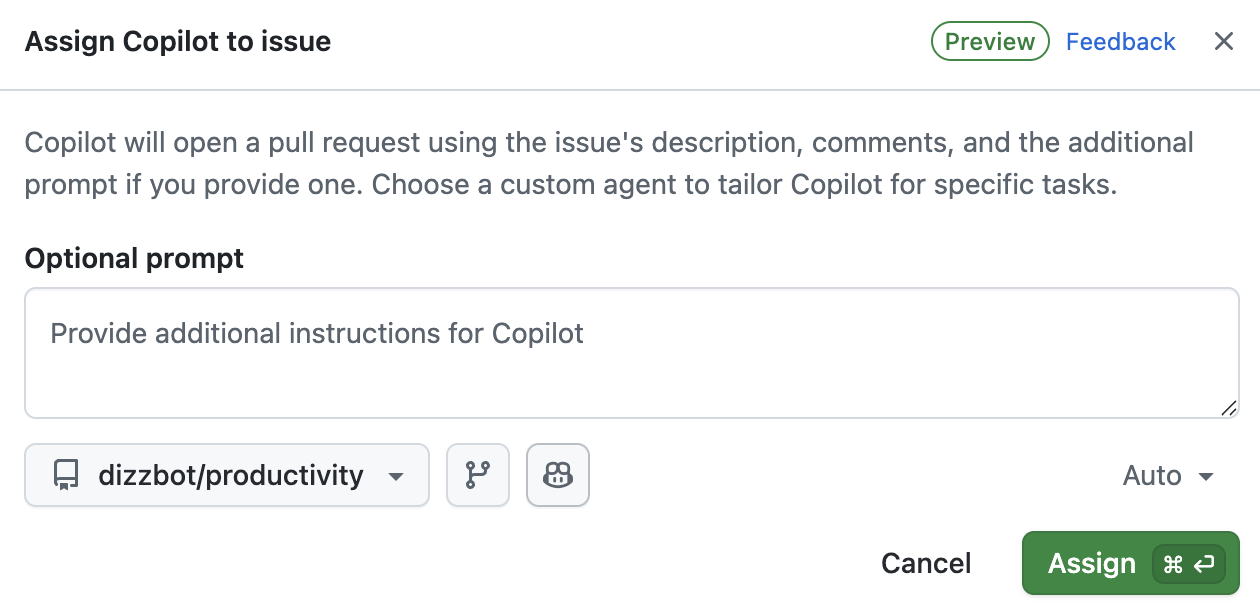
Additional options are displayed.
-
In the Optional prompt field you can add specific guidance for Copilot. Add any context, constraints, or specific requirements that will help Copilot to understand and complete the task.
For example, you might include instructions about specific coding patterns or frameworks to use, testing requirements, code style preferences, files or directories that should or shouldn't be modified.
In addition to the details you supply here, Copilot will use any custom instructions that have been configured for the target repository. See Добавление пользовательских инструкций репозитория для GitHub Copilot.
-
You can use the dropdown menus in the dialog to change the repository that Copilot will work in and the branch that it will branch off from.
All repositories where you have at least read access will be displayed in the repository dropdown menu. However, you can only select a repository if you have write access to it, and if Copilot облачный агент is enabled for that repository.
If you select a repository in a different organization than the issue's source organization, or if you select a public repository when the issue is in a private repository, a warning will be displayed.
If you don't specify a repository, Copilot will work in the same repository as the issue. If you don't specify a branch, Copilot will work from the default branch of the selected repository.
Совет
When you assign an issue to Copilot, it gets sent the issue title, description, any comments that currently exist, and any additional instructions you provide. After assigning the issue, Copilot will not be aware of, and therefore won't react to, any further comments that are added to the issue. If you have more information, or changes to the original requirement, add this as a comment in the pull request that Copilot raises.
-
По желанию, вы можете кликнуть , чтобы открыть выпадающее меню агента, если хотите назначить агента или Пользовательский агент агента со специализированным поведением и инструментами. Вы можете выбрать существующий Пользовательский агент из вашего репозитория, организации или предприятия. Вы также можете нажать «Создать агент», чтобы создать новый Профиль агента файл в выбранном репозитории и ветке. Дополнительные сведения см. в разделе Создание кастомных агентов для Copilot облачный агент.
Примечание.
Сторонние агенты доступны в планах GitHub Copilot Pro, GitHub Copilot Pro+, GitHub Copilot для бизнеса и GitHub Copilot Enterprise.
-
По желанию вы можете использовать выпадающее меню для выбора модели, которая Copilot будет использоваться. Дополнительные сведения см. в разделе Изменение модели ИИ для облачного агента GitHub Copilot.


You can also assign issues to Copilot from other places on GitHub.com:
- From the list of issues on a repository's Issues page.
- When viewing an issue in GitHub Проекты.
Seeding a new repository
When creating a new repository, you can ask Copilot to seed the new repository by entering a prompt.
-
В правом верхнем углу любой страницы выберите , а затем нажмите кнопку "Создать репозиторий".
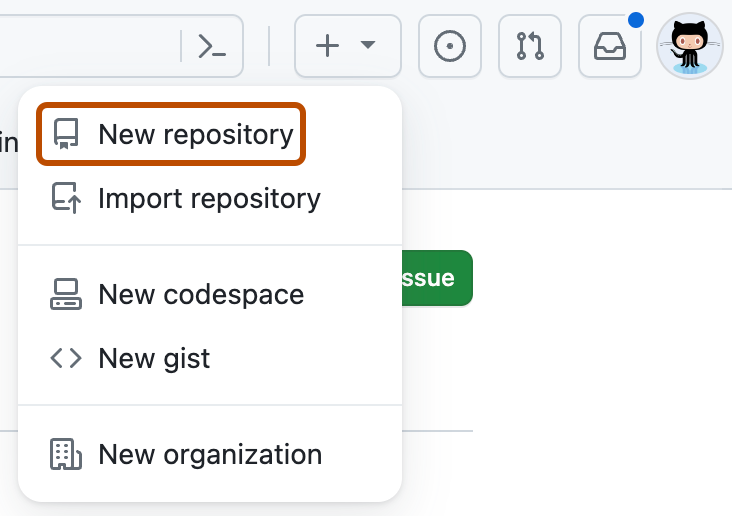
-
Используйте раскрывающееся меню "Владелец"**, **чтобы выбрать учетную запись, которую вы хотите владеть репозиторием.

-
In the Prompt field, enter a prompt describing what you want Copilot to build.
For example,
Create a Rust CLI for converting CSV spreadsheets to Markdown -
Щелкните Создать репозиторий.
Copilot will immediately open a draft pull request. Copilot will work on the task and push changes to its pull request, then add you as a reviewer when it has finished, triggering a notification.


Fixing a failing GitHub Actions workflow run
Примечание.
This feature is only available to Copilot Business and Копилот Энтерпрайз users.
When an GitHub Actions workflow run fails on a pull request branch, you can ask Copilot to investigate and fix the failure.
-
On GitHub, navigate to the failing workflow run job page.
-
Click the Fix with Copilot button.
Copilot will start a new session, investigate the cause of the failure, and push a fix to your branch.
Continuing work on a pull request
You can mention @copilot in a comment on any pull request to ask Copilot to make changes. This works on pull requests created by Copilot and on pull requests you or others created.
By default, Copilot pushes commits directly to the pull request branch. To create a separate pull request instead, describe that in your comment. You can also check out the branch and push changes yourself.
Batch review comments instead of submitting them individually. When submitting a pull request comment (not a review or review comment) through the GitHub web interface, select a model with the model picker. Copilot uses the model from the original pull request by default.
Copilot Отвечает только на комментарии людей, имеющих доступ к репозиторию для записи.
When Copilot starts a new session in response to your comment, an eyes emoji (👀) reaction appears on the comment. A "Copilot has started work" event appears in the pull request timeline.

Copilot remembers context from previous sessions on the same pull request, so follow-up requests are faster and more reliable. If the pull request was created by a Пользовательский агент, mentioning @copilot continues using that same agent.
Resolving merge conflicts
You can ask Copilot to resolve merge conflicts on a pull request in two ways:
- Using the "Fix with Copilot" button: If a pull request has merge conflicts, click the Fix with Copilot button that appears in the merge box.
- Using an @copilot mention: Mention
@copilotin a comment on the pull request and ask it to fix the conflicts—for example, "@copilot resolve the merge conflicts on this PR."
Copilot analyzes the conflicting changes, resolves them, and verifies that the build, tests, and linter still pass. It then requests your review so you can confirm the resolution before merging.
Managing GitHub Actions workflow runs
По умолчанию GitHub Actions рабочие процессы не запускаются автоматически при Copilot внесении изменений в pull-запрос.
GitHub Actions Рабочие процессы могут быть привилегированы и иметь доступ к конфиденциальным секретам. Проверьте предлагаемые изменения в запросе на вытягивание и убедитесь в том, что рабочие процессы можно спокойно выполнить в ветви запроса на вытягивание. Особенного внимания требуют предлагаемые изменения в каталоге .github/workflows/, влияющие на файлы рабочего процесса.
Чтобы разрешить GitHub Actions запуск рабочих процессов, нажмите кнопку «Одобрить» и запустить рабочие процессы в окне слияния pull-запроса.

По желанию можно настроить Copilot облачный агент так, чтобы GitHub Actions рабочие процессы работали без вмешательства человека. For more information, see Настройка настроек для облачного агента GitHub Copilot.
Giving feedback on Copilot's work
Use the feedback buttons on Copilot's pull requests and comments to rate the output. Your feedback helps improve Copilot's quality.
- On a pull request or comment from Copilot, click the thumbs up (👍) or thumbs down (👎) button.
- If you click the thumbs down button, optionally select a reason and leave a comment, then click Submit feedback.