About Dependabot
This quickstart guide walks you through setting up and enabling Dependabot, viewing Dependabot alerts, and updating your repository to use a secure version of the dependency.
Dependabot は、依存関係の管理に役立つ 3 つの異なる機能で構成されています。
- Dependabot alerts: リポジトリで使われている依存関係の脆弱性についてユーザーに通知します。
- Dependabot security updates: 使われている依存関係のうち、既知のセキュリティ脆弱性があるものを更新するための pull request を自動的に生成します。
- Dependabot version updates: 依存関係を最新に保つための pull request を自動的に生成します。
Prerequisites
For the purpose of this guide, we're going to use a demo repository to illustrate how Dependabot finds vulnerabilities in dependencies, where you can see Dependabot alerts on GitHub, and how you can explore, fix, or dismiss these alerts.
You need to start by forking the demo repository.
- Navigate to https://github.com/dependabot/demo.
- At the top of the page, on the right, click Fork.
- Select an owner (you can select your GitHub personal account) and type a repository name. For more information about forking repositories, see リポジトリをフォークする.
- Click Create fork.
Enabling Dependabot for your repository
You need to follow the steps below on the repository you forked in Prerequisites.
-
GitHub で、リポジトリのメイン ページに移動します。
-
リポジトリ名の下にある [Settings] をクリックします。 [設定] タブが表示されない場合は、 [] ドロップダウン メニューを選び、 [設定] をクリックします。
![タブを示すリポジトリ ヘッダーのスクリーンショット。 [設定] タブが濃いオレンジ色の枠線で強調表示されています。](/assets/cb-28260/images/help/repository/repo-actions-settings.png)
-
サイドバーの [Security] セクションで、[ Advanced Security] をクリックします。
-
Under "Dependabot", click Enable for Dependabot alerts, Dependabot security updates, and Dependabot version updates.
-
If you clicked Enable for Dependabot version updates, you can edit the default
dependabot.ymlconfiguration file that GitHub creates for you in the/.githubdirectory of your repository. To enable Dependabot version updates for your repository, you typically configure this file to suit your needs by editing the default file, and committing your changes. You can refer to the snippet provided in Dependabot バージョンの更新の構成 for an example.
![タブを示すリポジトリ ヘッダーのスクリーンショット。 [設定] タブが濃いオレンジ色の枠線で強調表示されています。](/assets/cb-28260/mw-1440/images/help/repository/repo-actions-settings.webp)
メモ
If the dependency graph is not already enabled for the repository, GitHub will enable it automatically when you enable Dependabot.
For more information about configuring each of these Dependabot features, see Dependabot アラートの構成, Dependabot セキュリティの更新の構成, and Dependabot バージョンの更新の構成.
Viewing Dependabot alerts for your repository
If Dependabot alerts are enabled for a repository, you can view Dependabot alerts on the "Security" tab for the repository. You can use the forked repository that you enabled Dependabot alerts on in the previous section.
-
GitHub で、リポジトリのメイン ページに移動します。
-
リポジトリ名の下にある [Security] をクリックします。 [Security] タブが表示されない場合は、 ドロップダウン メニューを選んでから、[Security] をクリックします。
![タブを示すリポジトリ ヘッダーのスクリーンショット。 [セキュリティ] タブが濃いオレンジ色の枠線で強調表示されています。](/assets/cb-17801/images/help/repository/security-tab.png)
-
セキュリティの概要の [脆弱性アラート] サイド バーで、 [Dependabot] をクリックします。 このオプションがない場合は、セキュリティ アラートにアクセスできないため、アクセス権を付与する必要があることを意味します。 詳細については、「リポジトリのセキュリティと分析設定を管理する」を参照してください
![セキュリティの概要のスクリーンショット。[Dependabot] タブが濃いオレンジ色の枠線で強調表示されています。](/assets/cb-15813/images/help/repository/dependabot-tab.png)
-
Review the open alerts on the Dependabot alerts page. By default, the page displays the Open tab, listing the open alerts. (You'll be able to view any closed alerts by clicking Closed.)
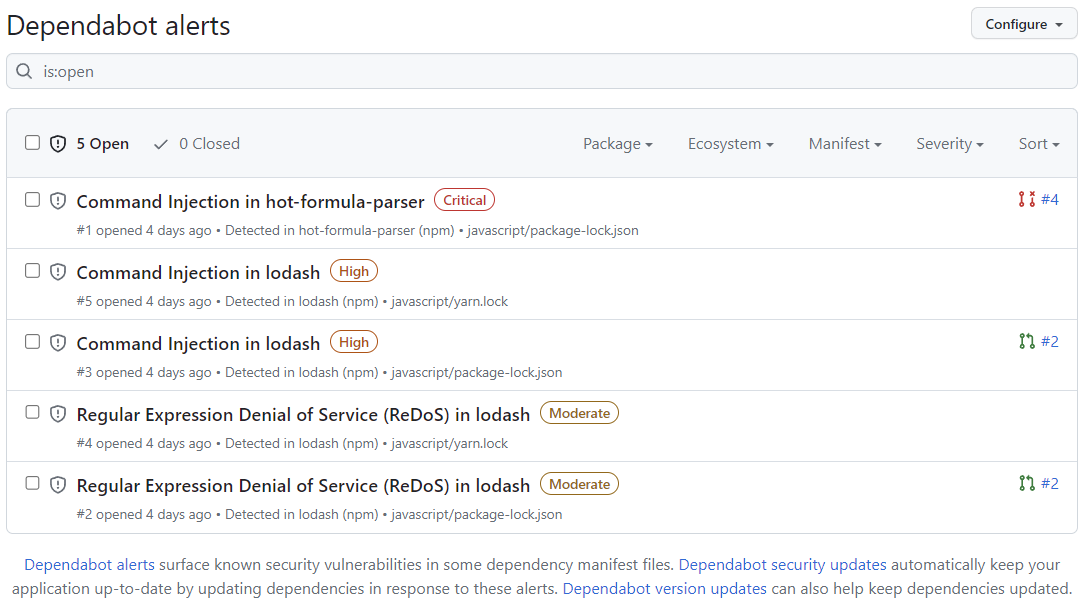
You can filter Dependabot alerts in the list, using a variety of filters or labels. For more information, see Dependabot アラートの表示と更新. You can also use Dependabot 自動トリアージ ルール to filter out false positive alerts or alerts you're not interested in. For more information, see Dependabot 自動トリアージ ルールについて.
-
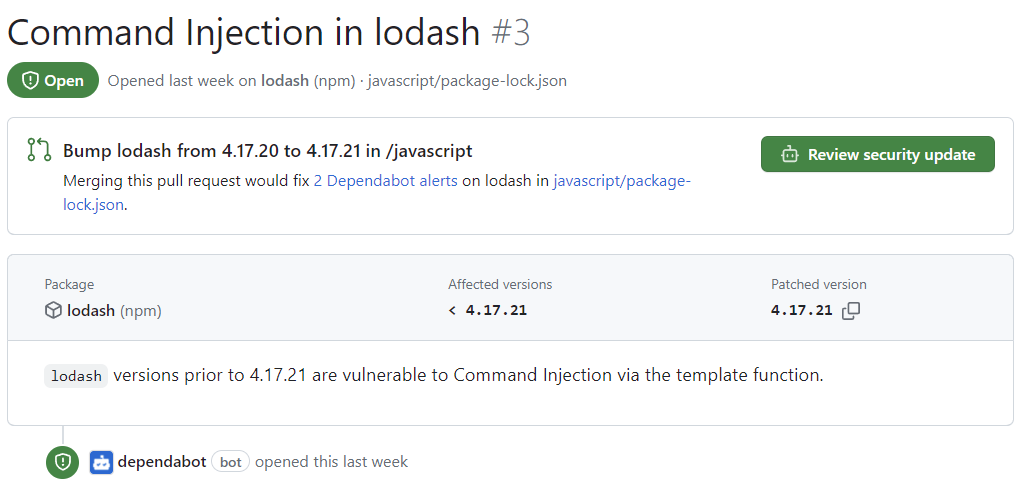
Click the "Command Injection in lodash" alert on the
javascript/package-lock.jsonfile. The details page for the alert will show the following information (note that some information may not apply to all alerts):- Whether Dependabot created a pull request that will fix the vulnerability. You can review the suggested security update by clicking Review security update.
- Package involved
- Affected versions
- Patched version
- Brief description of the vulnerability
-
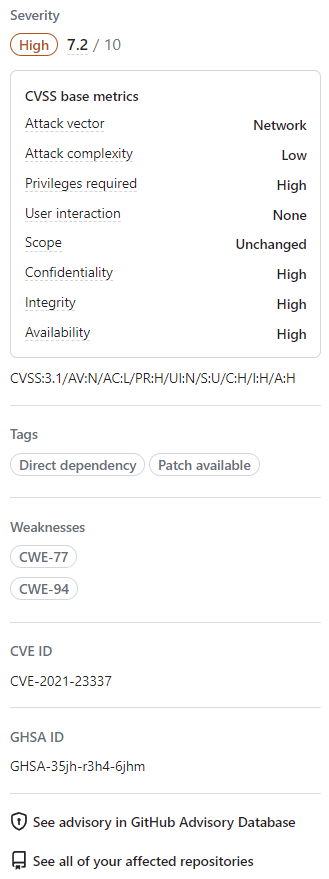
Optionally, you can also explore the information on the right-side of the page. Some of the information shown in the screenshot may not apply to every alert.
- Severity
- CVSS metrics: We use CVSS levels to assign severity levels. For more information, see GitHub Advisory Database について.
- Tags
- Weaknesses: List of CWEs related to the vulnerability, if applicable
- CVE ID: Unique CVE identifier for the vulnerability, if applicable
- GHSA ID: Unique identifier of the corresponding advisory on the GitHub Advisory Database. For more information, see GitHub Advisory Database について.
- Option to navigate to the advisory on the GitHub Advisory Database
- Option to see all of your repositories that are affected by this vulnerability
- Option to suggest improvements for this advisory on the GitHub Advisory Database
![タブを示すリポジトリ ヘッダーのスクリーンショット。 [セキュリティ] タブが濃いオレンジ色の枠線で強調表示されています。](/assets/cb-17801/mw-1440/images/help/repository/security-tab.webp)
![セキュリティの概要のスクリーンショット。[Dependabot] タブが濃いオレンジ色の枠線で強調表示されています。](/assets/cb-15813/mw-1440/images/help/repository/dependabot-tab.webp)


For more information about viewing, prioritizing, and sorting Dependabot alerts, see Dependabot アラートの表示と更新.
Fixing or dismissing a Dependabot alert
You can fix or dismiss Dependabot alerts on GitHub. Let's continue to use the forked repository as an example, and the "Command Injection in lodash" alert described in the previous section.
- Navigate to the Dependabot alerts tab for the repository. For more information, see the Viewing Dependabot alerts for your repository section above.
- Click an alert.
- Click the "Command Injection in lodash" alert on the
javascript/package-lock.jsonfile. - Review the alert. You can:
-
Review the suggested security update by clicking Review security update. This will open the pull request generated by Dependabot with the security fix.
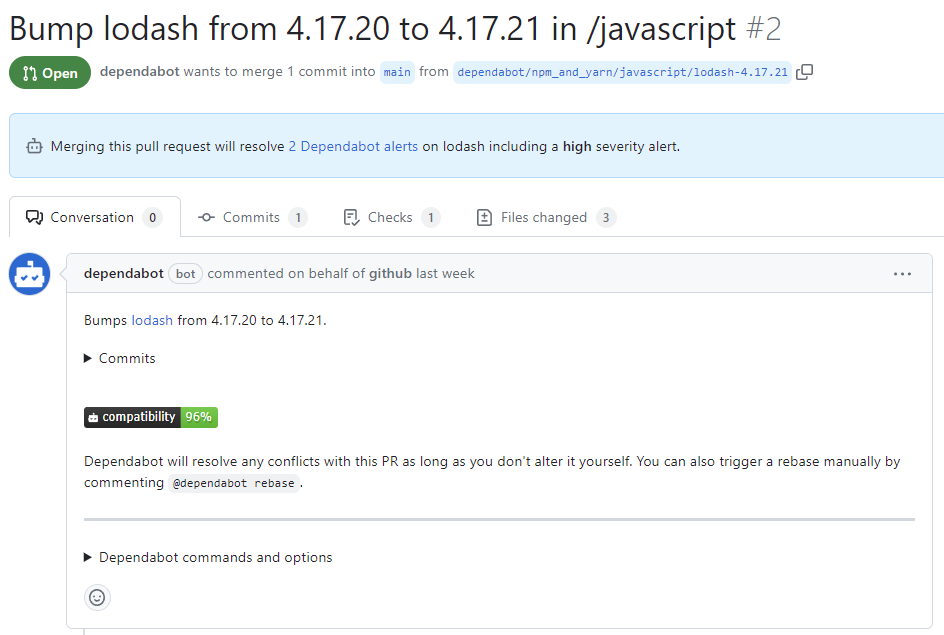
- On the pull request description, you can click Commits to explore the commits included in the pull request.
- You can also click Dependabot commands and options to learn about the commands that you can use to interact with the pull request.
- When you're ready to update your dependency and resolve the vulnerability, merge the pull request.
-
If you decide that you want to dismiss the alert
-
Go back to the alert details page.
-
On the top-right corner, click Dismiss alert.
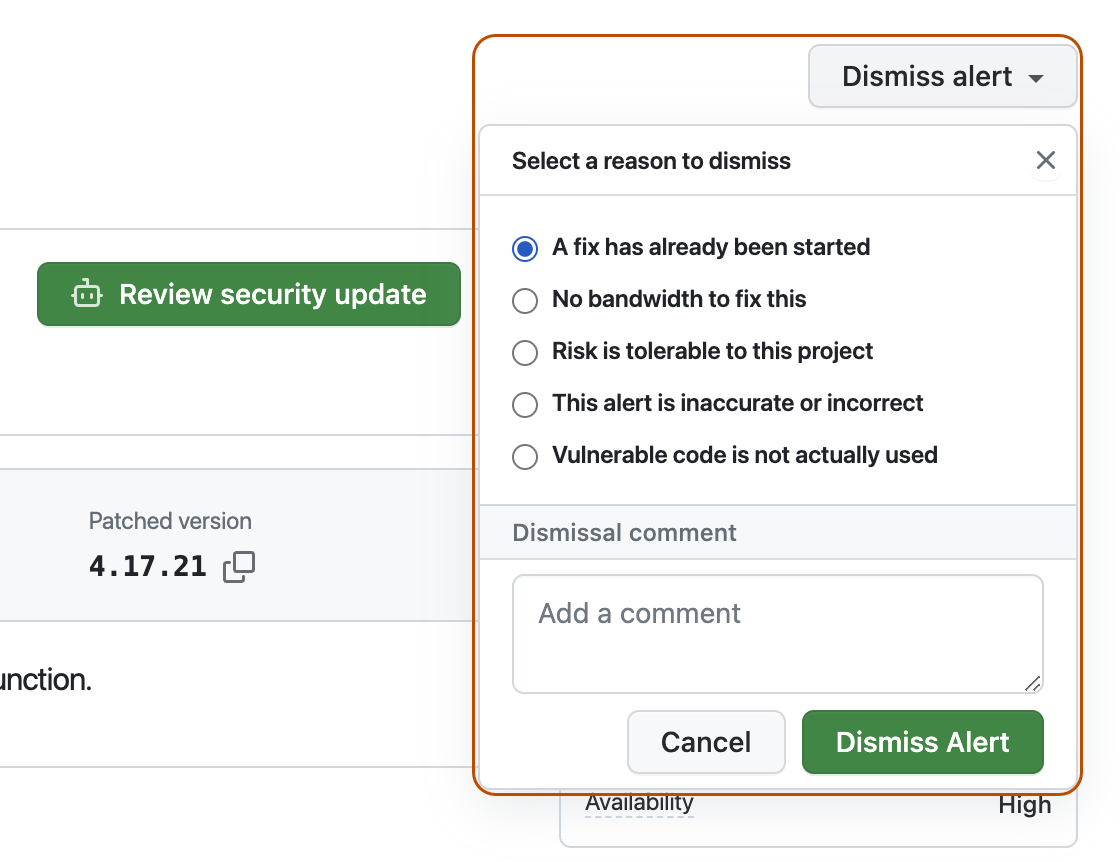
-
Select a reason for dismissing the alert.
-
Optionally, add a dismissal comment. The dismissal comment will be added to the alert timeline and can be used as justification during auditing and reporting.
-
Click Dismiss alert. The alert won't appear anymore in the Open tab of the alert list, and you are able to view it in the Closed tab.
-
-


For more information about reviewing and updating Dependabot alerts, see Dependabot アラートの表示と更新.
Troubleshooting
You may need to do some troubleshooting if:
- Dependabot is blocked from creating a pull request to fix an alert, or
- The information reported by Dependabot is not what you expect.
For more information, see Dependabot エラーのトラブルシューティング and 脆弱性のある依存関係の検出のトラブルシューティング, respectively.
Next steps
For more information about configuring Dependabot updates, see Dependabot セキュリティの更新の構成 and Dependabot バージョンの更新の構成.
For more information about configuring Dependabot for an organization, see Dependabot アラートの構成.
For more information about viewing pull requests opened by Dependabot, see 依存関係の更新に関するPull Requestを管理する.
For more information about the security advisories that contribute to Dependabot alerts, see GitHub Advisory Database でのセキュリティ アドバイザリの参照.
For more information about configuring notifications about Dependabot alerts, see Dependabot アラートの通知を構成する.