Asking GitHub Copilot チャット about code scanning alerts
With a GitHub Copilot Enterprise license, you can ask Copilot チャット for help to better understand security alerts, including code scanning alerts, in repositories in your organization. For more information, see GitHub で GitHub Copilot に質問をする.
Generating suggested fixes for code scanning alerts
GitHub Copilot Autofix can generate fixes for alerts identified by code scanning analysis. Most CodeQL alert types are supported. For more information, see コード スキャンにおける Copilot Autofix の責任ある使用.
メモ
GitHub Copilot Autofix の使用には、GitHub Copilot のサブスクリプションは不要です。 Copilotの自動修正 は、GitHub.com のすべてのパブリック リポジトリだけでなく、GitHub Code Security のライセンスを持つ organization や Enterprise が所有する内部またはプライベート リポジトリでも使用できます。
- GitHub で、リポジトリのメイン ページに移動します。
- リポジトリ名の下にある [Security] をクリックします。 [Security] タブが表示されない場合は、 ドロップダウン メニューを選んでから、[Security] をクリックします。
![タブを示すリポジトリ ヘッダーのスクリーンショット。 [セキュリティ] タブが濃いオレンジ色の枠線で強調表示されています。](/assets/cb-17801/images/help/repository/security-tab.png)
- 左側のサイドバーで、 [Code scanning] をクリックします。
- Click the name of an alert.
- If Copilotの自動修正 can suggest a fix, at the top of the page, click Generate fix.
- Once the suggested fix has been generated, at the bottom of the page, you can click Create PR with fix to automatically generate a pull request with the suggested fix. A new branch is created from the default branch, the generated fix is committed and a draft pull request is created. You can test and edit the suggested fix as you would with any other fix.
![タブを示すリポジトリ ヘッダーのスクリーンショット。 [セキュリティ] タブが濃いオレンジ色の枠線で強調表示されています。](/assets/cb-17801/mw-1440/images/help/repository/security-tab.webp)
You can also use the Autofix API for historical alerts endpoints to generate, get, and commit suggested fixes.
- Create an autofix for a code scanning alert
- Get the status of an autofix for a code scanning alert
- Commit an autofix for a code scanning alert
Copilotの自動修正 for code scanning alerts won't be able to generate a fix for every alert in every situation. The feature operates on a best-effort basis and is not guaranteed to succeed 100% of the time. For information about the limitations of automatically generated fixes, see Limitations of suggestions.
Assigning alerts to Copilot コーディング エージェント
メモ
This option is currently in public preview and is subject to change. Copilot コーディング エージェント must be available in the repository.
You can assign Copilot to apply an autofix. Copilot analyzes the code scanning alert, creates a remediation plan, and implements the necessary code changes in a pull request.
- GitHub で、リポジトリのメイン ページに移動します。
- リポジトリ名の下にある [Security] をクリックします。 [Security] タブが表示されない場合は、 ドロップダウン メニューを選んでから、[Security] をクリックします。
- 左側のサイドバーで、 [Code scanning] をクリックします。
- Click the name of an alert.
- If an autofix has not been generated and Copilotの自動修正 can suggest a fix, at the top of the page, click Generate fix.
- In the right-side menu, click Assignees.
- Select "Copilot".
Within 30 seconds, Copilot will open a pull request to address the alert and will include a summary of the fixes and details of the changes made. Once created, the pull request is shown in the "Development" section.
Fixing an alert manually
Anyone with write permission for a repository can fix an alert by committing a correction to the code. If the repository has code scanning scheduled to run on pull requests, it's best to raise a pull request with your correction. This will trigger code scanning analysis of the changes and test that your fix doesn't introduce any new problems. For more information, see Triaging code scanning alerts in pull requests.
You can use the free text search or the filters to display a subset of alerts and then in turn mark all matching alerts as closed.
Alerts may be fixed in one branch but not in another. You can use the "branch" filter, on the summary of alerts, to check whether an alert is fixed in a particular branch.

既定ではないブランチでフィルター処理したのと同じアラートが、既定のブランチに存在する場合、そのアラートのアラート ページには、その状態が既定ではないブランチでの状態と競合する場合でも、既定のブランチのアラートの状態のみが反映されることに注意してください。 たとえば、アラートの概要の branch-x の [Open](オープン) リストに表示されるアラートは、そのアラートが既定のブランチで既に修正されている場合、アラート ページに "Fixed"(修正済み) の状態で表示される場合があります。 フィルター処理したブランチのアラートの状態は、アラート ページの右側の [Affected branches](影響を受けるブランチ) セクションで確認できます。
メモ
If you run code scanning using multiple configurations, the same alert will sometimes be generated by more than one configuration. Unless you run all configurations regularly, you may see alerts that are fixed in one configuration but not in another. These stale configurations and alerts can be removed from a branch. For more information, see Removing stale configurations and alerts from a branch.
Dismissing alerts
There are two ways of closing an alert. You can fix the problem in the code, or you can dismiss the alert.
Dismissing an alert is a way of closing an alert that you don't think needs to be fixed. たとえば、テストで使われるだけのコードのエラーや、エラーを修正するための労力がコードを改善することによる潜在的な利点よりも大きい場合です。 You can dismiss alerts from code scanning annotations in code, or from the summary list within the Security tab.
When you dismiss an alert:
- It's dismissed in all branches.
- The alert is removed from the number of current alerts for your project.
- The alert is moved to the "Closed" list in the summary of alerts, from where you can reopen it, if required.
- The reason why you closed the alert is recorded.
- Optionally, you can comment on a dismissal to record the context of an alert dismissal.
- Next time code scanning runs, the same code won't generate an alert.
To dismiss alerts:
-
GitHub で、リポジトリのメイン ページに移動します。
-
リポジトリ名の下にある [Security] をクリックします。 [Security] タブが表示されない場合は、 ドロップダウン メニューを選んでから、[Security] をクリックします。
-
左側のサイドバーで、 [Code scanning] をクリックします。
-
If you want to dismiss an alert, it's important to explore the alert first, so that you can choose the correct dismissal reason. Click the alert you'd like to explore.
-
Review the alert, then click Dismiss alert and choose, or type, a reason for closing the alert.
クエリが将来の分析に含まれ続けるかに影響することがあるので、ドロップダウンメニューから適切な理由を選択することは重要です。 必要に応じて、却下についてコメントを残し、アラートを却下したコンテキストを記録することもできます。 無視のコメントはアラート タイムラインに追加され、監査と報告の間に正当な理由として使用できます。 コード スキャン REST API を使用して、コメントを取得または設定できます。 コメントは、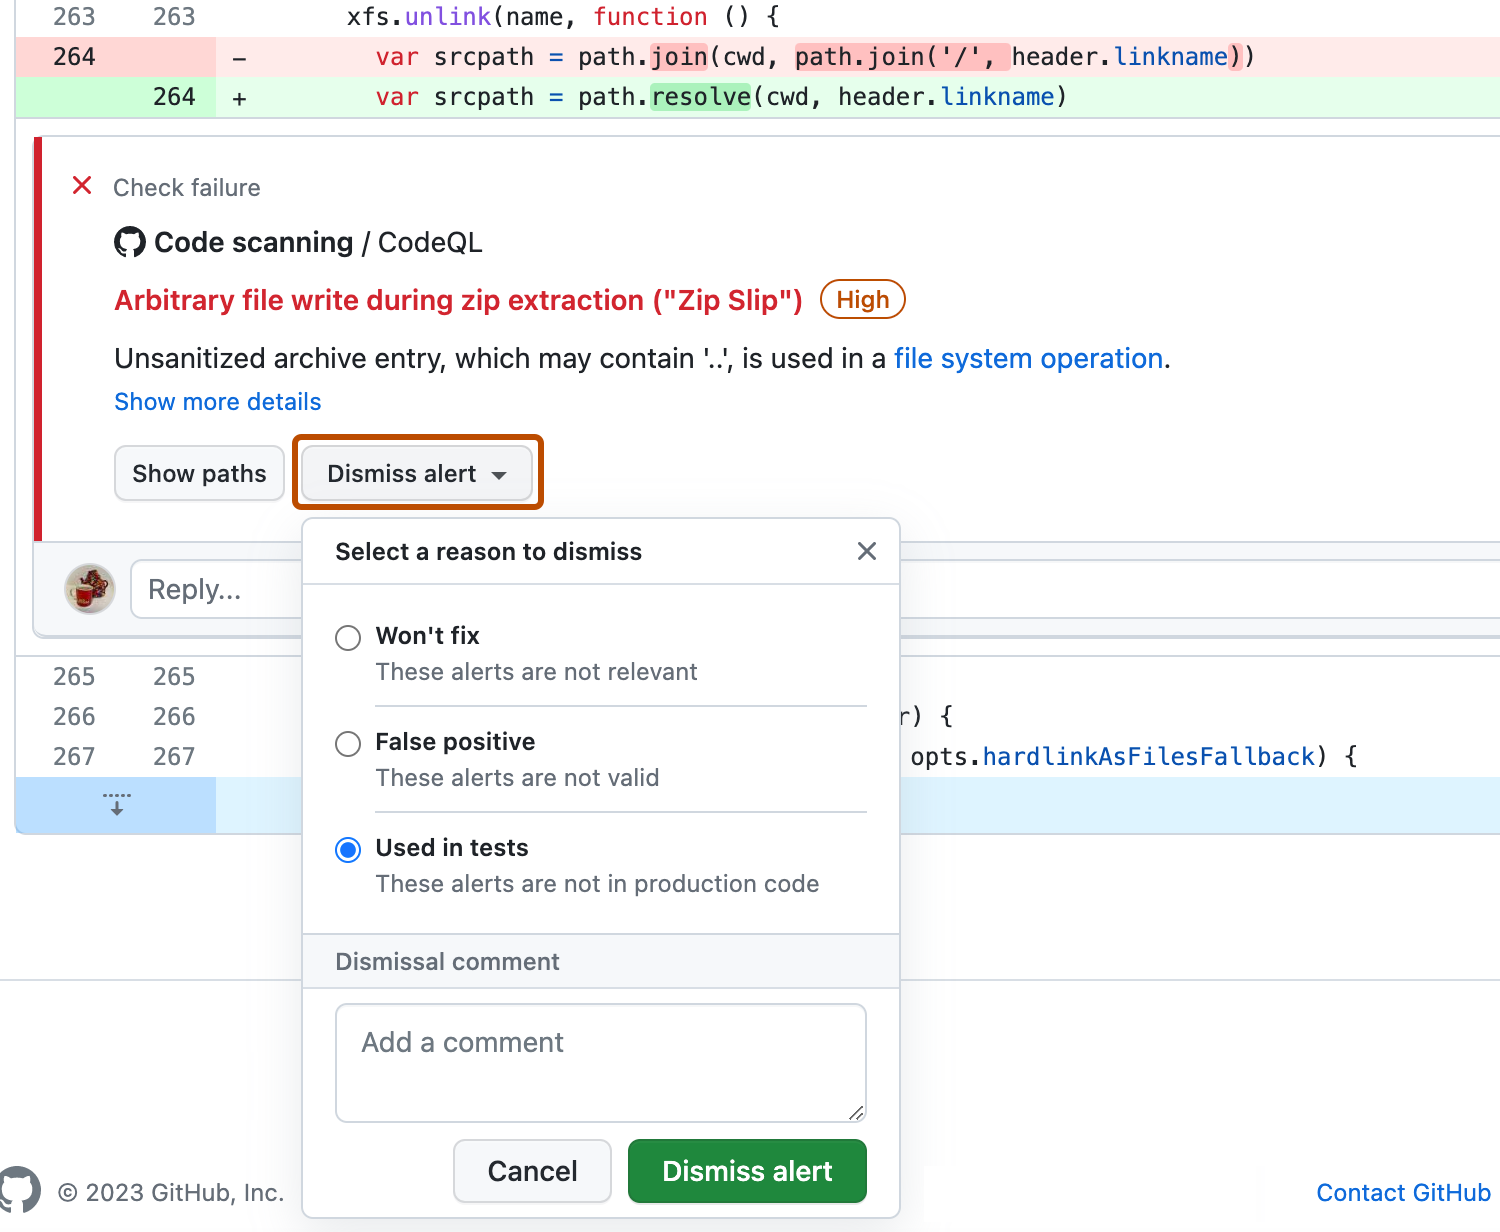
alerts/{alert_number}エンドポイントのdismissed_commentに含まれます。 詳しくは、「コード スキャン用の REST API エンドポイント」をご覧ください。たとえばコードがサポートされていないサニタイズ ライブラリを使っているといった理由で、CodeQL のアラートを擬陽性の結果として却下する場合、CodeQL に貢献して分析を改善することを検討してください。 CodeQL の詳細については、「CodeQL に貢献する」を参照してください。

Dismissing multiple alerts at once
If a project has multiple alerts that you want to dismiss for the same reason, you can bulk dismiss them from the summary of alerts. Typically, you'll want to filter the list and then dismiss all of the matching alerts. For example, you might want to dismiss all of the current alerts in the project that have been tagged for a particular Common Weakness Enumeration (CWE) vulnerability.
Re-opening dismissed alerts
If you dismiss an alert but later realize that you need to fix the alert, you can re-open it and fix the problem with the code. Display the list of closed alerts, find the alert, display it, and reopen it. You can then fix the alert in the same way as any other alert.
Removing stale configurations and alerts from a branch
You may have multiple code scanning configurations on a single repository. When run, multiple configurations can generate the same alert. Additionally, if the configurations are run on different schedules, the alert statuses may become out-of-date for infrequent or stale configurations. For more information on alerts from multiple configurations, see Code scanningアラートについて.
-
GitHub で、リポジトリのメイン ページに移動します。
-
リポジトリ名の下にある [Security] をクリックします。 [Security] タブが表示されない場合は、 ドロップダウン メニューを選んでから、[Security] をクリックします。
-
左側のサイドバーで、 [Code scanning] をクリックします。
-
Under "Code scanning", click a code scanning alert.
-
In the "Affected branches" section of the sidebar, click the desired branch.
-
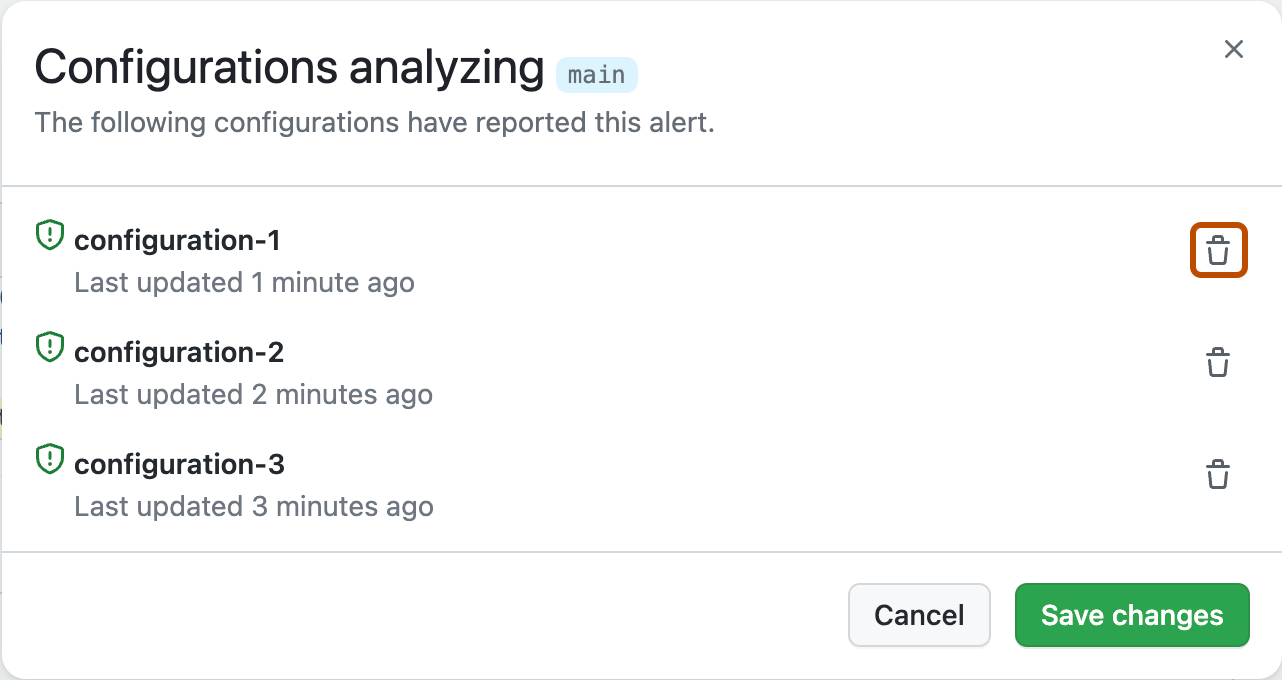
In the "Configurations analyzing" dialog, review details of the configurations that reported this alert on the selected branch. To delete an unwanted configuration for the desired branch, click .
If you delete a configuration by mistake, click Cancel to avoid applying your changes.
-
Once you have removed any unwanted configurations and confirmed the expected configurations are displayed, click Save changes.
If you save your changes after accidentally deleting a configuration, re-run the configuration to update the alert. For more information on re-running configurations that use GitHub Actions, see ワークフローとジョブの再実行.

メモ
- If you remove all code scanning configurations for the default branch of your repository, the default branch will remain in the "Affected branches" sidebar, but it will not be analyzed by any configurations.
- If you remove all code scanning configurations for any branch other than the default branch of your repository, that branch will be removed from the "Affected branches" sidebar.